
Butterfinger Balls
If you’re looking for a delightful sweet treat that combines the rich flavors of chocolate and peanut butter, look no further than Butterfinger Balls. These no-bake confections are a perfect fusion of creamy peanut butter and crunchy, sweet candy coating, making them an irresistible snack or dessert that will please anyone with a sweet tooth. They are easy to make and even easier to eat, making them a fantastic addition to parties, gatherings, or just a cozy night at home.
Key Takeaways:
- Preparation time: 30 minutes (plus chilling time)
- Difficulty level: Easy
- Main ingredients: Peanut butter, graham cracker crumbs, powdered sugar, chocolate coating
- Special techniques: No-bake method, chilling for firmness
- Storage information: Keep refrigerated for up to two weeks
Introduction to Butterfinger Balls:
Butterfinger Balls are a modern treat inspired by the classic Butterfinger candy bar, which has been a beloved staple in American candy culture since its introduction in 1923. The Butterfinger bar, known for its crispy, crunchy peanut butter core coated in chocolate, has delighted candy lovers for generations. The creation of Butterfinger Balls takes the essence of this iconic candy and transforms it into bite-sized morsels that are easy to make at home.
The significance of these treats lies not only in their delicious flavor but also in their adaptability. They can be made for various occasions, from holiday parties to casual family gatherings. The no-bake nature of Butterfinger Balls makes them a hit with both novice and experienced bakers alike, providing a quick and satisfying way to indulge in a sweet treat without the hassle of an oven.
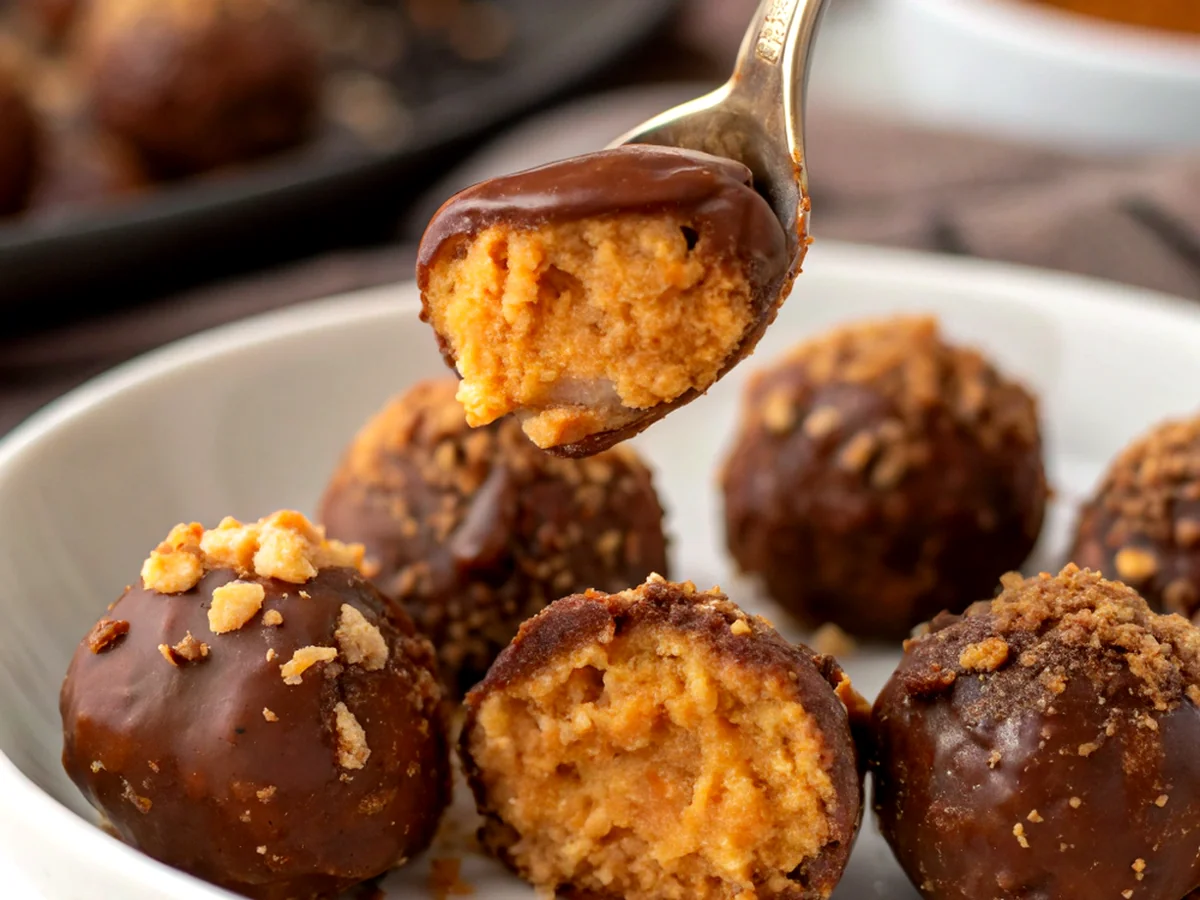
Ingredients for Butterfinger Balls:
- 1 cup peanut butter: Provides the rich, creamy base and flavor.
- 1 cup graham cracker crumbs: Adds texture and structure to the balls.
- 1 cup powdered sugar: Sweetens the mixture and binds the ingredients together.
- 1-2 cups chocolate chips (milk or dark): Used for coating the balls, adding a delicious chocolatey flavor.
- Optional toppings (crushed nuts, sprinkles, or additional crushed graham crackers): For added texture and visual appeal.
Preparation Steps for Butterfinger Balls:
1. Mix the Base: In a medium mixing bowl, combine the peanut butter, graham cracker crumbs, and powdered sugar. Stir until the mixture is well blended and forms a thick, cohesive dough. This may take a minute or two, but it should be firm enough to hold its shape when formed into balls.
2. Form the Balls: Using your hands, scoop out small portions of the mixture (about 1 inch in diameter) and roll them into balls. Place the formed balls on a baking sheet lined with parchment paper. You can use a cookie scoop for uniform sizes.
3. Chill the Balls: Once all the balls are formed, place the baking sheet in the refrigerator for about 30 minutes. This step is crucial as it helps the balls firm up, making them easier to coat in chocolate.
4. Melt the Chocolate: While the balls are chilling, melt the chocolate chips in a microwave-safe bowl. Heat in 30-second intervals, stirring in between, until the chocolate is smooth and fully melted.
5. Coat the Balls: Remove the chilled balls from the refrigerator. Using a fork or toothpick, dip each ball into the melted chocolate, ensuring it is fully coated. Allow excess chocolate to drip off before placing the balls back on the parchment-lined baking sheet.
6. Add Toppings (Optional): If desired, sprinkle the coated balls with crushed nuts, sprinkles, or additional crushed graham crackers before the chocolate sets.
7. Chill Again: Place the coated balls back in the refrigerator for another 30 minutes to allow the chocolate to harden completely.
8. Serve and Enjoy: Once the chocolate has set, your Butterfinger Balls are ready to be enjoyed! Store any leftovers in an airtight container in the fridge.
Flavor Profile of Butterfinger Balls:
The flavor profile of Butterfinger Balls is a delightful combination of sweet and salty. The core of peanut butter offers a creamy richness that perfectly balances the sweetness of the powdered sugar and the crunchiness of the graham cracker crumbs. The chocolate coating adds a layer of deep cocoa flavor, which contrasts beautifully with the sweet, nutty center.
The texture is equally enticing; the balls are smooth and creamy on the inside while the chocolate coating provides a satisfying snap. Each bite delivers a burst of flavor, with the aroma of roasted peanuts and chocolate wafting through the air, making them irresistible to anyone nearby.
Benefits of Butterfinger Balls:
While Butterfinger Balls are primarily a treat, they do offer some nutritional benefits, especially if made with natural peanut butter. Peanut butter is a good source of protein and healthy fats, which can help keep you feeling full. Additionally, the use of graham cracker crumbs adds some fiber to the mix.
Of course, moderation is key, as these treats are high in sugar and calories. However, they can be enjoyed as an occasional indulgence without guilt, especially when shared among friends and family. Plus, making them at home allows you to control the ingredients, potentially opting for healthier alternatives if desired.
Serving Suggestions for Butterfinger Balls:
Butterfinger Balls can be enjoyed on their own as a sweet snack, but they also make a wonderful addition to dessert platters or party trays. Serve them alongside other treats like brownies, cookies, or fruit for a well-rounded dessert experience.
For a fun presentation, consider placing them in mini cupcake liners and arranging them on a decorative platter. They pair beautifully with a glass of cold milk or a warm cup of coffee, enhancing the overall flavor experience. For special occasions, you can even drizzle melted chocolate or white chocolate on top for an extra touch of elegance.
Storage Tips for Butterfinger Balls:
To keep your Butterfinger Balls fresh and delicious, store them in an airtight container in the refrigerator. They can typically last for up to two weeks when properly stored. If you want to keep them longer, you can also freeze them; just make sure to separate layers with parchment paper to prevent sticking. When ready to enjoy, simply thaw them in the refrigerator for a few hours before serving.
Conclusion:
Butterfinger Balls are a delightful and easy-to-make treat that brings the beloved flavors of the classic candy bar into a bite-sized form. Whether you’re making them for a special occasion or just to satisfy a sweet craving, these no-bake delights are sure to impress. Give this recipe a try, and you might just find your new favorite sweet!
FAQ Section:
1. Can I use natural peanut butter instead of regular peanut butter?
- Yes, natural peanut butter can be used, but it may result in a slightly different texture since it tends to be runnier than processed peanut butter.
2. How can I make these gluten-free?
- You can substitute graham cracker crumbs with gluten-free alternatives, such as crushed gluten-free cookies or gluten-free graham crackers.
3. Can I use different types of chocolate for coating?
- Absolutely! You can use milk chocolate, dark chocolate, or even white chocolate to coat your Butterfinger Balls.
4. Do I need to chill the balls before coating them?
- Yes, chilling helps firm them up, making them easier to dip in chocolate without falling apart.
5. Can I add other ingredients like nuts or coconut?
- Yes, feel free to mix in chopped nuts, shredded coconut, or even crushed candy bars to customize your Butterfinger Balls.
6. How do I know when the chocolate is melted properly?
- The chocolate should be smooth and glossy; avoid overheating, as it can seize up. Stir it well after each interval in the microwave.
7. Can I make these ahead of time?
- Yes, Butterfinger Balls can be made a few days in advance and stored in the refrigerator until you’re ready to serve them.
8. What can I do if my mixture is too dry?
- If your mixture seems too dry, you can add a bit more peanut butter or a splash of milk to achieve the desired consistency.
Full Recipe
Butterfinger Balls

Ingredients:
- 1 cup powdered sugar
- 1 cup salted butter, softened
- 1 teaspoon vanilla extract
- 2 cups creamy peanut butter
- 1 cup Butterfinger bits, plus more for topping (optional)
- 3 cups chocolate melting wafers

Directions:
1. In a large bowl or stand mixer, combine the peanut butter, softened butter, and vanilla extract. Cream the mixture together for about 30 seconds.
2. Sift the powdered sugar into the bowl and beat until the mixture is smooth.
3. Gently mix in the Butterfinger bits until they are evenly incorporated.
4. Chill the mixture in the refrigerator for 30 minutes to firm it up.
5. Line a cookie sheet with parchment paper. Use a medium cookie scoop to portion out the peanut butter mixture and roll it into balls. Place the balls on the prepared cookie sheet and chill in the freezer for 20 to 30 minutes.
6. While the balls are chilling, melt the chocolate melting wafers. Use a wide glass and heat them in 30-second intervals, stirring in between until fully melted.
7. Using a fork or dipping tool, dip each chilled ball into the melted chocolate, then place them back on the parchment paper.
8. Sprinkle the tops of the chocolate-covered balls with additional Butterfinger bits if desired. Allow them to set until the chocolate hardens.

Your delightful Butterfinger balls are now ready to enjoy!