
Spicy Herb-Infused Garlic Pickles Tutorial
If you’re looking for a way to elevate your pickle game, look no further than these Spicy Herb-Infused Garlic Pickles. Bursting with flavor and a delightful kick, these pickles are not only a great snack but also make for a perfect addition to sandwiches, charcuterie boards, or just about any meal. The combination of garlic, spices, and fresh herbs will have your taste buds dancing!
Key Takeaways:
- Preparation time: 30 minutes (plus 24 hours for brining)
- Difficulty level: Easy
- Main ingredients: Cucumbers, garlic, red chili flakes, fresh herbs (like dill), vinegar, water, and salt
- Special techniques: Quick pickling method, infusion of flavors
- Storage information: Can be stored in the refrigerator for up to 2 months
Introduction to Spicy Herb-Infused Garlic Pickles Tutorial:
Pickling is an ancient preservation technique that has been used for centuries to extend the shelf life of fruits and vegetables. The process of pickling not only preserves but also enhances the flavor of the ingredients involved. In many cultures, pickles hold a significant place in culinary traditions, being served alongside various dishes or enjoyed as a snack.
The idea of adding spicy elements and aromatic herbs to pickles is a modern twist that has gained popularity in recent years. This Spicy Herb-Infused Garlic Pickles recipe embodies the spirit of traditional pickling while embracing the bold flavors of spices and herbs. The infusion of garlic and the heat from red chili flakes create a pickle that is not just tangy but also adds an exciting kick to your palate. Whether you’re a pickle aficionado or a newcomer, this tutorial will guide you through creating your very own jar of spicy goodness!
Ingredients for Spicy Herb-Infused Garlic Pickles Tutorial:
- Cucumbers (4-6 small): The star ingredient, providing the crunch and freshness.
- Garlic cloves (4-6, peeled and smashed): Adds rich flavor and aroma to the pickles.
- Fresh dill (a handful): Offers a classic pickle flavor; can substitute with other herbs like thyme or basil for a different twist.
- Red chili flakes (1-2 teaspoons): Provides the desired spiciness; adjust according to your heat preference.
- White vinegar (2 cups): The acid necessary for pickling, giving the pickles their tangy flavor.
- Water (2 cups): Dilutes the vinegar and helps balance the acidity.
- Salt (2 tablespoons): Essential for flavor and preservation.
- Sugar (1 tablespoon): Balances the acidity of the vinegar and enhances the overall flavor.
Preparation Steps for Spicy Herb-Infused Garlic Pickles Tutorial:
1. Prepare the Cucumbers: Start by washing the cucumbers thoroughly. If using larger cucumbers, consider slicing them into spears or rounds to fit into jars more easily. Small cucumbers can be left whole if desired.
2. Make the Brine: In a medium saucepan, combine the white vinegar, water, salt, and sugar. Heat over medium heat, stirring occasionally until the salt and sugar dissolve completely. Remove from heat and let the brine cool to room temperature.
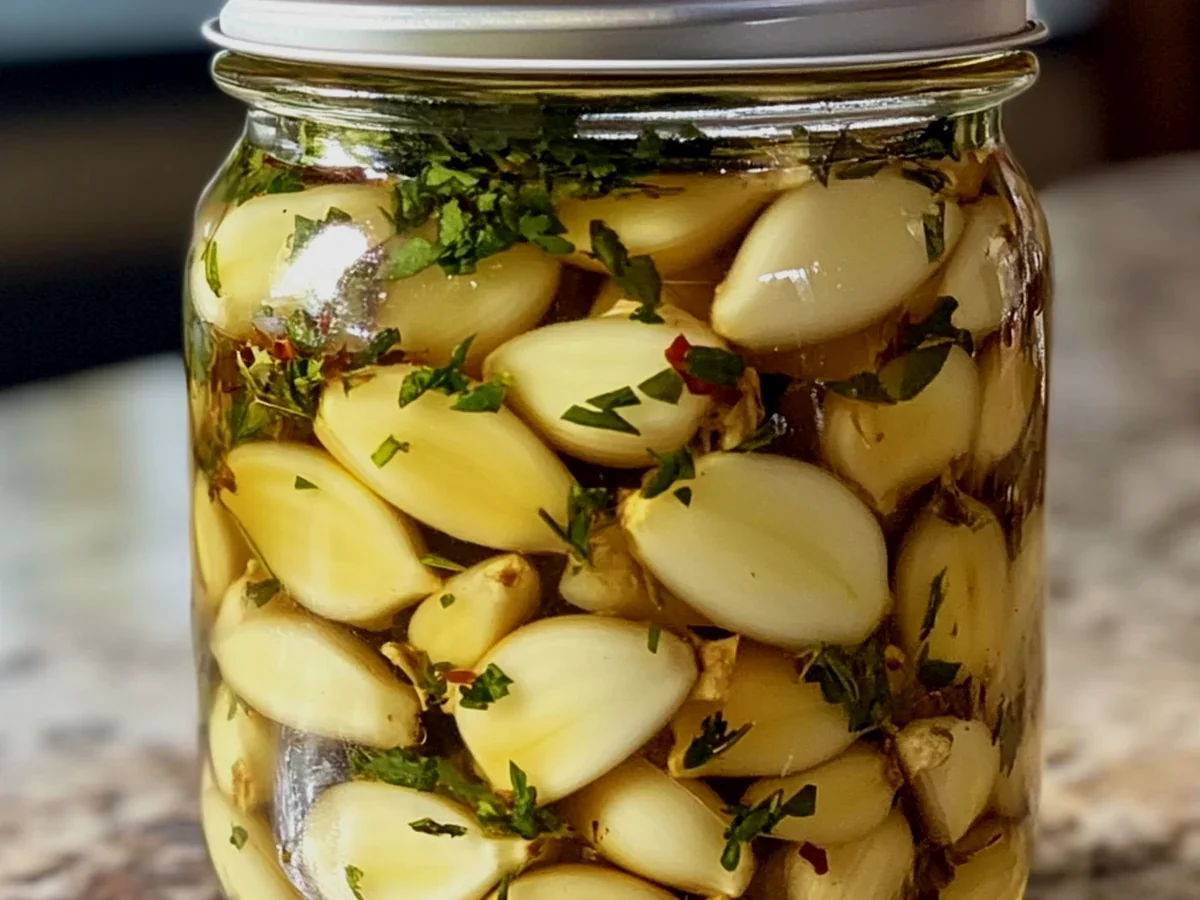
3. Pack the Jars: In clean glass jars, place the smashed garlic cloves, fresh dill, and red chili flakes at the bottom. Next, tightly pack the cucumbers into the jars, leaving about an inch of headspace at the top.
4. Pour the Brine: Once the brine has cooled, pour it over the cucumbers in the jars, ensuring they are fully submerged. If needed, use a clean utensil to press down the cucumbers to eliminate air pockets.
5. Seal and Refrigerate: Seal the jars tightly with lids and place them in the refrigerator. Let the pickles infuse for at least 24 hours before consuming for the best flavor. They can be enjoyed after this time but will continue to develop flavor the longer they sit.
6. Enjoy: After 24 hours, your spicy herb-infused garlic pickles are ready to be enjoyed!
Flavor Profile of Spicy Herb-Infused Garlic Pickles Tutorial:
These pickles are a delightful mix of flavors that come together to create a harmonious taste experience. The initial bite offers a crisp, refreshing crunch from the cucumbers, followed by the pungent warmth of garlic that infuses the brine. The heat from the red chili flakes adds a gentle but noticeable spice that lingers pleasantly on the palate without overwhelming it. The fresh dill contributes a distinctive herbaceous note that rounds out the flavor, making each bite a complex and enjoyable experience. The tanginess of the vinegar brine ties all the elements together, creating a well-balanced pickle that is both zesty and savory.
Benefits of Spicy Herb-Infused Garlic Pickles Tutorial:
These pickles aren’t just delicious; they also come with a variety of health benefits. Cucumbers are low in calories but high in water content, making them a hydrating snack. They are also a good source of vitamin K, which is essential for bone health. Garlic is known for its immunity-boosting properties and potential heart health benefits, thanks to its ability to lower cholesterol and blood pressure.
The spices in the pickles, particularly red chili flakes, may also provide metabolism-boosting benefits and add a kick to your meals without excessive calories. Additionally, the fermentation process that occurs during pickling can promote gut health by introducing beneficial probiotics, especially if left to ferment for a longer time.
Serving Suggestions for Spicy Herb-Infused Garlic Pickles Tutorial:
These Spicy Herb-Infused Garlic Pickles can be enjoyed in numerous ways! Serve them as a crunchy snack on their own or add them to sandwiches for an extra layer of flavor. They pair beautifully with grilled meats and can enhance a charcuterie board with their vibrant colors and bold flavors. Incorporate them into a salad for a zesty crunch or chop them up and mix them into potato salad or coleslaw for a delightful twist. For a fun appetizer, skewer them with cheese and olives for a quick and easy treat.
Storage Tips for Spicy Herb-Infused Garlic Pickles Tutorial:
To ensure your Spicy Herb-Infused Garlic Pickles stay fresh and delicious, store them in the refrigerator in their sealed jars. They can last up to 2 months when stored properly. Always use clean utensils when removing pickles from the jar to avoid introducing bacteria. If you notice any off smells, discoloration, or mold, it’s best to discard the pickles for safety.
If you’d love to experiment, consider trying different types of vinegar or adding other spices such as mustard seeds or peppercorns to customize the flavor to your liking.
Conclusion:
In conclusion, making your own Spicy Herb-Infused Garlic Pickles is an easy and rewarding way to enjoy bold flavors right at home. With simple ingredients and a straightforward process, you can create a tangy and spicy snack that will impress your family and friends. Don’t hesitate to try this recipe and make it your own!
FAQ Section:
1. How long do these pickles need to sit before they are ready?
It’s best to let the pickles sit for at least 24 hours before eating, but they will taste even better after a few days of infusion.
2. Can I use other vegetables for pickling?
Absolutely! Carrots, radishes, green beans, and even cauliflower can be pickled using this same method.
3. How spicy are these pickles?
The spiciness can be adjusted by varying the amount of red chili flakes you use. Start with a small amount if you prefer milder pickles.
4. Do I need to can these pickles for long-term storage?
No, this recipe is designed for refrigerator pickling, which is easier and doesn’t require canning. Just store them in the fridge.
5. Can I use other herbs instead of dill?
Yes! You can experiment with other herbs like basil, thyme, or even coriander to create different flavor profiles.
6. What type of cucumbers should I use?
Pickling cucumbers, such as Kirby cucumbers, are ideal because they are firm and have fewer seeds, but regular cucumbers can work as well.
7. Can I make this recipe vegan?
Yes, all the ingredients listed are plant-based, making this recipe inherently vegan.
8. Is there a way to make these pickles shelf-stable?
To make shelf-stable pickles, you would need to follow proper canning procedures, including sterilizing jars and using a water bath canning method.
Full Recipe
Zesty Pickled Garlic with Chili and Herbs

Ingredients:
- 2 cups garlic cloves, peeled
- 1 cup white vinegar
- 1 cup apple cider vinegar
- 1 tablespoon kosher salt
- 1 tablespoon sugar
- 1 teaspoon black peppercorns
- 1 teaspoon mustard seeds
- 2-3 dried red chili peppers (adjust to taste)
- 1 teaspoon dried oregano
- 1 teaspoon fresh thyme leaves
- 1 cup water
- Optional: 1 small carrot, sliced into rounds (for added crunch and flavor)

Instructions:

1. Sterilize your jars: Begin by boiling your glass jars and lids in water for 10 minutes to ensure they are clean and free of bacteria. Let them air dry on a clean towel.

2. Prepare the brine: In a medium saucepan, combine the white vinegar, apple cider vinegar, water, kosher salt, and sugar. Add the black peppercorns, mustard seeds, dried red chili peppers, oregano, and thyme. Bring the mixture to a boil, stirring until the salt and sugar dissolve. Once boiling, reduce the heat and let it simmer for about 5 minutes to allow the flavors to meld.

3. Pack the jars: Place the peeled garlic cloves in the sterilized jars. If using, add the sliced carrots for additional texture and flavor. Make sure to pack the garlic tightly but without crushing them.

4. Pour the brine: Carefully pour the hot brine over the garlic cloves, ensuring they are completely submerged. Leave about 1/2 inch of headspace at the top of each jar. If necessary, press down the garlic gently to keep them submerged.

5. Seal the jars: Wipe the rims of the jars with a clean cloth to remove any residue. Place the sterilized lids on top and screw on the metal bands until they are fingertip-tight.

6. Process the jars: For longer shelf life, process the jars in a boiling water bath for 10 minutes. Ensure the water covers the jars by at least an inch. Remove the jars and let them cool on a clean towel or cooling rack.

7. Storage: Once completely cooled, check the seals by pressing down on the center of each lid. If it pops back, the jar did not seal properly and should be refrigerated and consumed within a few weeks. Properly sealed jars can be stored in a cool, dark place for up to 1 year.

8. Enjoy: Allow the pickled garlic to sit for at least 2 weeks before consuming to develop the flavors fully. These zesty pickled garlic cloves make a perfect addition to salads, antipasto platters, or as a flavorful condiment for sandwiches and burgers.